Showing posts with label Poultry. Show all posts
Tuesday, 30 April 2019

Chicken & Pork Satay (Chicken Rice Paste Marinade)


* in collaboration with Dancing Chef for Hainanese Chicken Rice Paste

I do not know if anyone else encounter the same problem as me....as my parents age (they are very old now ), their palate for food are becoming like children. In their case, strictly no spicy food now. They wouldn't even give their younger days' favourite curry a chance. It's definitely challenging for me to cook for the entire family nowadays. I have to be more creative in my rendition of traditional spicy dishes for the family. This Chicken & Pork Satay is one of which that I attempted using Dancing Chef's Hainanese Chicken Rice Paste. Not spicy and Yes!...different from tradition but I must say it's very easy and very palatable! I also made the Hainanese Chicken Rice Chili for my husband and myself. As I was writing this post....my family was feasting happily and heartily. Mother's Day is coming and we had an early mini celebration as my husband would be travelling for work...but Mother's Day/Father's Day or not...I'm always happy to cook for my parents and my love ones. These are the moments that I truly treasure.

#DancingChef


Ingredients for Satay Meats (yield about 30 sticks chicken & 30 sticks pork) :
  • 1/2 packet Dancing Chef Hainanese Chicken Rice Paste for Chicken
  • 1/2 packet Dancing Chef Hainanese Chicken Rice Paste for Pork
  • 800g boneless chicken thing meat (cleaned and cut to strips)
  • 600g pork belly meat (cleaned and cut to strips)
  • 1/2 to 1 tsp sugar for chicken (or to taste)
  • 1/2 to 1 tsp sugar for pork (or to taste)
  • Cooking oil to grease the pan

(tsp = teaspoon; tbsp = tablespoon) 


Method :
  1. Use a food mallet to tenderise meats if necessary.
  2. Add seasonings and meats into 2 bowls respectively (1 bowl for chicken and 1 bowl for pork)
  3. Marinade all meats in chiller for 1 hour. 
  4. Meanwhile, use a brush to oil bamboo skewers
  5. Before cook, remove meats from chiller.
  6. Skew all meats with bamboo sticks.
  7. Turn on medium heat. Brush cooking oil to grease grill pan.
  8. Grill meat skewers on grill pan. Brush oil onto meats occasionally until fully cooked and meat caramelised nicely.
  9. Serve whilst hot with or without sauce(s).

(scroll to bottom of page, click on "Print" or "PDF" icon for printer friendly recipe)


Sunday, 18 November 2018

Giam Chye Ark (Duck & Salted Vegetable Soup) 咸菜鸭汤


* in collaboration with Xndo for Zero Rice

The marriage of salty and sour flavours from the few key ingredients in Giam Chye Ark (Duck & Salted Vegetable Soup) 咸菜鸭汤 always serve to tantalize appetites.

Salted vegetables 咸菜 (aka salted mustard green) are cooling in nature. Hence, I personally prefer to neutralize with some 'heaty' ingredients such as ginger, garlic and white peppercorns. This' especially comforting during the rainy days.

This is a must-have traditional dish in many South East Asian Chinese families. There are many variations and versions. I prefer to prepare mine as a single pot dish to just go with  rice. 

Xndo Zero rice is certified low GI, non-GMO, high fibre and suitable even for diabetics! Ready to eat, a healthy diet has never been easier! Promotion now on at all GNC Singapore & Xndo stores islandwide. 

#ZeroRice #XndoRecipes


Ingredients (enough for 2 to 4 pax) :
  • 2 to 4 packets Xndo Zero Rice. Each box contain 4 packets. 
  • Half a duck (chopped into pieces)(skin removed, washed & drained)
  • 200 gm salted vegetables/giam chye/salted mustard green 咸菜 (soaked in water for 15 to 30 minutes before cook)
  • 3 pcs pickled sour plums (available in supermarkets/markets)
  • 1 pc dried preserved date (optional)(available in supermarkets/markets)
  • 2 carrots (chopped into chunks)
  • 2 to 3 tomatoes (chopped into quarters)
  • 1 tray of tofu/beancurd (available in supermarkets/markets)(cut into chunks)
  • 2 tbsp white peppercorns
  • 15 cloves of garlic (peeled and pressed)
  • 4-5 slices ginger
  • 1.5 litre water

(tsp = teaspoon; tbsp = tablespoon)    

Method : 
  1. Remove fats/skin from duck meat. Set duck fat aside. 
  2. Blanch duck pieces in boiling water for 5 minutes to remove scum beforehand. Rinse and clean duck meat in running water after that.
  3. Render a little duck fat in stock pot. Sauté ginger, garlic and peppercorns till aromatic. 
  4. Add all ingredients into soup pot EXCEPT tofu and half portion of tomatoes.
  5. Add 1.5 liter water into soup pot. Turn on high heat till water/soup reaches boiling point. Once the water/soup boils, turn to low heat and continue to simmer for 1.5 hours. Duck meat is tough. It takes longer to reach tenderness. 
  6. Add tofu and the rest of tomatoes to simmer for 5 to 10 minutes before serve. 
  7. Duck meat should be fall-off-the-bone kind of tender. Yet tasty. Salted vegetables still flavourful.
  8. Serve whilst hot with Xndo Zero Rice. 
Tip : Choose the stem portion of the salted vegetables. It works better for soups. The leaf portions are more suitable for other cooking processes such as stir frying.


Tuesday, 17 July 2018

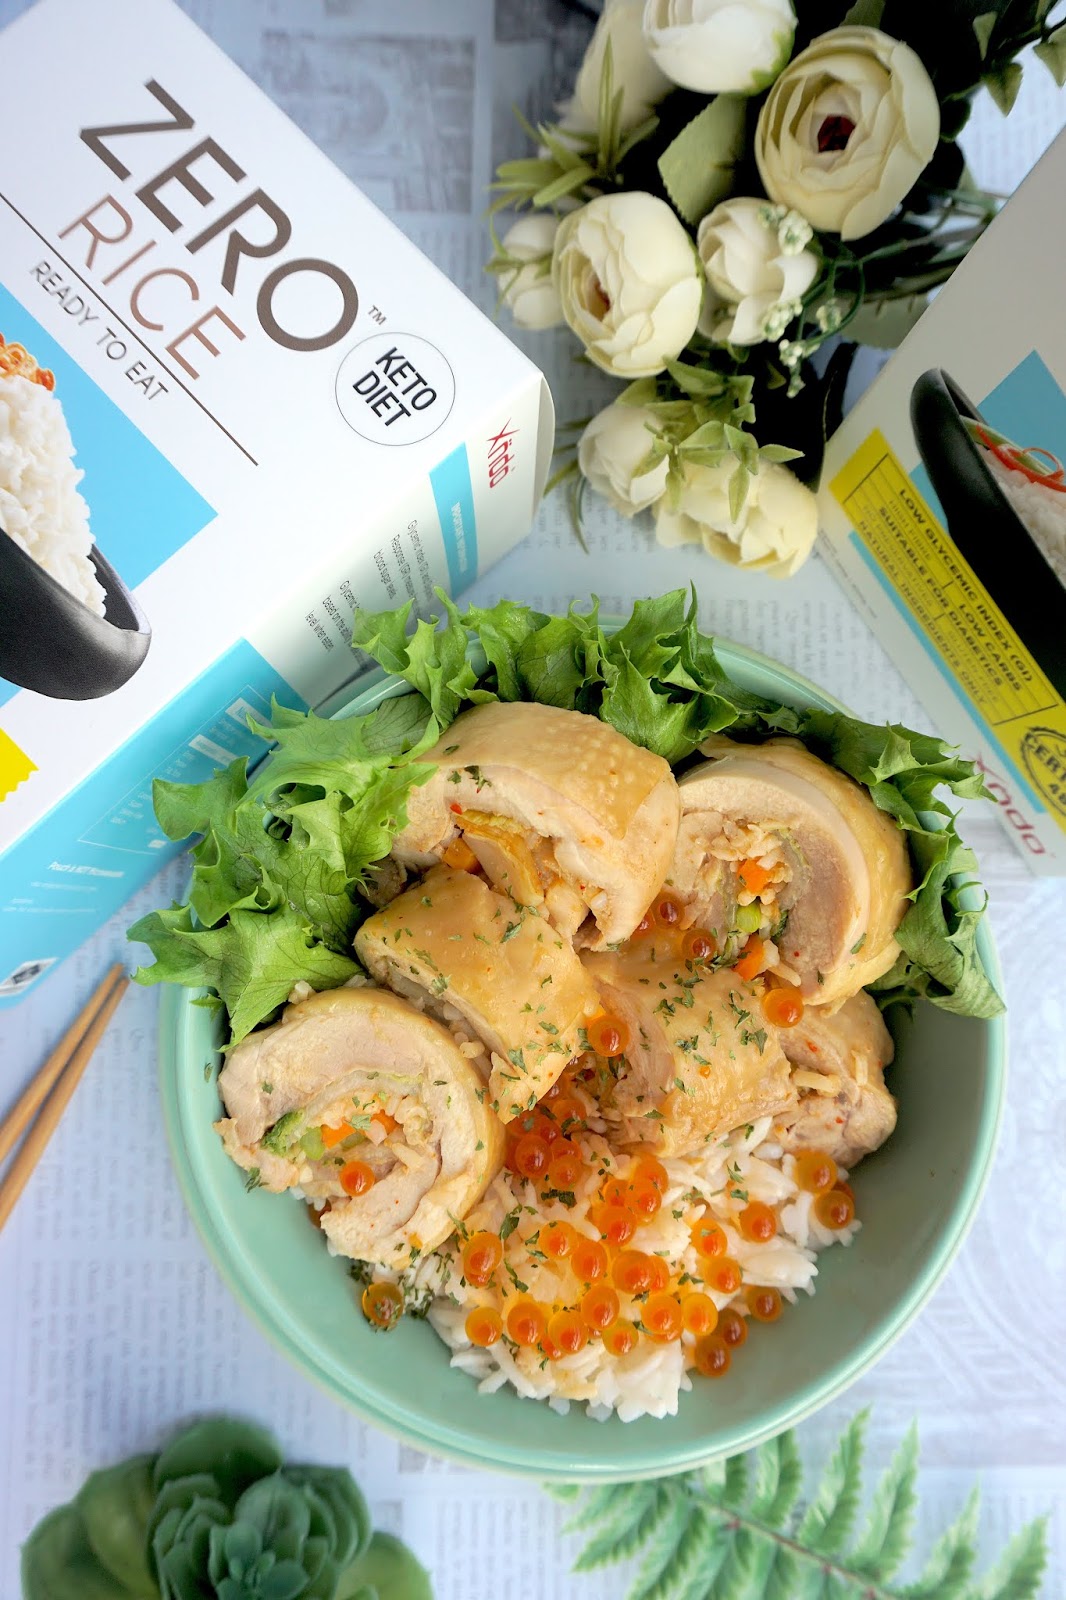
Kimchi Chicken Rice 泡菜鸡饭


*in collaboration with Xndo for Zero Rice

I'm sharing here a simple and flavourful Kimchi Chicken Rice 泡菜鸡饭 dish that's easy to prepare and delightful to the palate.

Benefits of Xndo® ZeroTM Rice

  •  Ready-to-eat
  •  Low carbs (Only 95KCAL)
  •  High in soluble fibre
  •  8 times more soluble fibre than ordinary rice
  •  Low Glycemic Index (GI) 48 (Certified)
  •  Suitable for Diabetics
  •  Keto-friendly

Xndo® ZeroTM Rice is made from premium quality Thai long-grain white rice and freshly ground Konjac Root. Formulated to be lower in carbohydrates than ordinary rice, Xndo® ZeroTM Rice contains 8 times more soluble fibre. This slows down digestion, prolongs the sensation of fullness and keeps your digestive system healthy. More importantly, Xndo® ZeroTM Rice has low glycemic index (GI) and stabilises blood sugar levels. Xndo® ZeroTM Rice has a soft chewy texture, absorbs gravies well and can be easily used in place of ordinary rice.

More information can be found at: https://www.xndo.net/zero-rice-5-packs.html


Group A : Main Meal Ingredient : 
  • 1 packet Xndo Zero Rice per pax. Each box contain 4 packets. 

Group B : Ingredients for Kimchi Chicken Roll (enough for 4 pax) :
  • 2 large pcs boneless chicken legs (keep or remove skin at your preference)
  • 6 large pcs wong bok leaves (blanched and drained beforehand)
  • 1/2 pc carrot (julienned)
  • 6 to 8 pcs baby asparagus (optional)
  • 1/2 cup kimchi

Group C : Seasonings for Chicken :
  • 1 tsp minced garlic
  • 1 tsp minced ginger
  • 1 tsp sesame oil
  • 2 tbsp soy sauce
  • 1/2 cup kimchi (diced)

Group D : Garnishing & Condiments
  • 1 tbsp ikura/salmon roe (optional)
  • parsley flakes (for garnishing)(optional)
  • fresh salad greens (for garnishing)(optional)

    (tsp = teaspoon; tbsp = tablespoon)    


    Method : 
    1. Flatten boneless chicken meat with a mallet.
    2. Marinade boneless chicken meat with Group C seasonings. 
    3. Assemble Kimchi chicken rolls with Group B ingredients. Roll tightly and chill in refrigerator overnight or half a day.
    4. When ready to cook, steam chicken rolls till fully cooked.  
    5. Towards last 2 to 3 minutes of steaming, add 1 packet Xndo Zero Rice to each bowl. 
    6. Dish out, slice the chicken rolls and garnish with Group D ingredients.
    7. Serve whilst hot. 


    Monday, 18 December 2017

    Portuguese Chicken Rice 澳门葡国鸡饭


    *in collaboration with Casa Rinaldi for a Festive Mystery Box Challenge

    I received a Casa Rinaldi Festive Mystery Box Challenge. I was to cook a dish using ALL the Casa Rinaldi's items that were sent to me. I was so pleased with the Casa Rinaldi's products that I decided to create a second dish! This Portuguese Chicken Rice 葡国鸡饭 dish  was a special order from my husband when he saw the items in the mystery box. 

    The Casa Rinaldi's items in my mystery box challenge include : 
    • Integrale Rice
    • Grilled Artichokes in Sunflower Oil
    • Rosemary
    • Extra Virgin Olive Oil Spray (EVOO Spray) 
    • Balsamic Pearls

    What exactly is Portuguese Chicken Rice 澳门葡国鸡饭? From my understanding, it's not really an European Portuguese dish. Rather, the dish should have its origin from Macau, which was a Portugal colony. And this Portuguese Chicken Rice 澳门葡国鸡饭 is really one of Macau's local dish with influences from its colonial days. In brief, the Portuguese Chicken Rice 澳门葡国鸡饭 is really a simple dish comprising fried rice, potatoes, sauce and chicken all baked together before serve. At one glance, the Portuguese Chicken Rice 澳门葡国鸡饭 looks like baked rice with cheese. Actually, I had not used any cheese in this rendition. Instead, coconut cream was used to create the fragrant and yummy sauce! I'd also used the Casa Rinaldi's grilled artichoke, EVOO spray and balsamic pearls to make a side salad. I love the combo as they complement each other so cohesively. 

    After cooking and savouring 2 full casseroles of Portuguese Chicken Rice 澳门葡国鸡饭, I could understand why my husband specifically requested for me to cook this dish. It's very tasty but less the oily and heavy feel like the usual baked rice. Of course, I must not forget the superior quality of Casa Rinaldi's seasonings and produces that had made it easy for me to prepare this dish to satisfaction. This' surely another dish that'll receive thumbs up from  my family this festive season!

    May this season bring you joy and gifts of happiness. Casa Rinaldi is giving away 3 Mystery Boxes with $168 worth of products at http://bit.ly/2BkHcq2

    Casa Rinaldi products are now available at NTUC Finest and Redmart.


    Main Ingredients (enough for 2 to 3 pax) :
    • 2 to 3 pcs fresh boneless chicken thigh meat (cut to bite size chunks, do not remove skin)
    • 2 cups Casa Rinaldi's Integrale Rice (it's brown rice!)
    • 6 baby potatoes (sliced) or 2 small potatoes (cut to chunks)(for fried rice)
    • 2 mid sized onions (peeled and finely chopped)(for fried rice)
    • 5 cloves garlic (peeled and finely chopped)(for fried rice)
    • 2 eggs (for fried rice)
    • 2 eggs (to break atop baked chicken rice last 5 minutes in oven)
    • 6 cherry tomatoes (for baked rice)(optional)
    • parsley flakes (for garnishing)(optional)
    • water (to cook rice)

    Seasonings for Chicken 
    • 1/2 to 1 tsp salt (or to taste)
    • 1/2 tsp sugar (or to taste)
    • 1 tsp grounded black pepper (or to taste)
    • 1 tbsp light soy sauce (or to taste)
    • 1 tsp sesame oil (or to taste)

    Seasonings for Rice 
    • salt (to taste)
    • pepper (to taste)
    • 1 small sprig rosemary (finely chopped)
    • 1 tbsp cooking oil

    Seasonings for Sauce
    • 200 ml coconut cream
    • 1 cup chicken stock
    • 1 tsp turmeric powder (or to taste)
    • 1 tsp chili powder (or to taste)
    • 1/2 tsp cumin powder (or to taste)
    • 1 tsp sugar (or to taste)
    • 1/2 tsp salt (or to taste)
    • 2 tbsp corn starch

    Ingredients & Seasonings for Side Salad
    • 1 to 2 pcs of Casa Rinaldi's Grilled Artichokes (finely chopped - approx. 2 to 3 tsp)
    • a handful of broccoli (blanched)
    • 1 mid sized onion (peeled and julienned, raw)
    • 5 cherry tomatoes (halved)
    • 1 tsp Casa Rinaldi's Balsamic Pearls/Vinegar (or to taste)
    • Casa Rinaldi's EVOO spray (as salad dressing)
    • salt (to taste)

    Method : 
    1. Pre-soak integral rice grains and cook as per packet instructions. Store cooked rice in refrigerator for few hours or overnight.
    2. Pre-marinade chicken with seasonings for min. 2 hours.
    3. When ready to cook, air fry or pan fry chicken pieces till golden brown and skin slightly crispy. Set aside.
    4. Mix all sauce seasonings in a bowl and set aside.
    5. Pre-heat oven to 180C.
    6. In a pan, heat cooking oil, toss in finely chopped rosemary, garlic and onions. Stir fry till fragrant. 
    7. Fold in potatoes and fry till slightly browned. 
    8. Fold in chilled cooked rice and give it a quick stir fry.
    9. Dig a well in the rice and fold in 2 beaten eggs. Turn to high heat to fry eggs and rice till even and fragrant. Turn off heat when satisfied.
    10. Heat sauce mixture in a saucepan and turn off heat when it begins to bubble.
    11. To assemble, scoop fried rice and potatoes onto oven safe casserole(s), arrange chicken pieces and cherry tomatoes on top of rice and fold in cooked sauce.
    12. Send casserole(s) to bake in oven for 10 minutes.
    13. Remove casserole(s) from oven when time's up. Crack an egg onto each casserole and send back to bake in oven for another 5 to 8 minutes. 
    14. Meanwhile, assemble all salad ingredients and seasonings in a serving bowl and get ready to serve.
    15. Remove casserole(s) from oven when time's up. Garnish and serve whilst hot.

    (scroll to bottom of page, click on "Print" or "PDF" icon for printer friendly recipe)


    Wednesday, 20 September 2017

    Cantonese Roast Duck 广式烧鸭


    My family members are true blue Cantonese that enjoy any kind of Cantonese roasts, be it roast pork, char siew, roast chicken or duck. The Cantonese Roast Duck 广式烧鸭 probably tops my family's list. I usually have to queue early at the popular stalls over weekends to buy our favourite roast duck. Sometimes, I disappoint them by coming home empty handed when the roast ducks are sold out in the morning! Seeing how much they love this Cantonese Roast Duck 广式烧鸭 spurred me on to do it myself at home. 

    i have done this Cantonese Roast Duck 广式烧鸭 quite a few times as of now. In view of my poor stitching skills, I had tweaked it from the traditional way of sealing the poaching liquid in the duck cavity. Instead, I inserted  pineapple chunks into the cavity to keep the meat tender and moist. I have also simplified the processes a little to suit my home kitchen environment. Albeit all these changes, I do not think I have compromised much in taste and texture. Not as traditional in the prepping and not as difficult as most people perceived, but this homemade version of Cantonese Roast Duck 广式烧鸭 is a hit at home. 


    Ingredients (enough for 4 pax) :
    • 1 duck (about 2 to 2.5 kg)(cleaned and pat dry) 
    • 1 tbsp Chinese five spice powder (to dry rub the duck)
    • 2 tsp salt (to dry rub the duck)
    • 1 tsp grounded pepper (to dry rub the duck)(I used grounded Szechuan peppercorn)
    • 1 slice pineapple (cut to chunks)

    Poaching Mixture (A) :
    • 1 cinnamon stick
    • 2 star anise (broken into smaller pieces)
    • 3 cloves
    • 6 cloves garlic (finely chopped)
    • 6 slices ginger
    • 3 stalks spring onion (tie in a knot)
    • 1 tbsp five spice powder
    • 2 tbsp hoisin sauce
    • 4 tbsp light soy sauce
    • 2 tbsp dark soy sauce
    • 4 tbsp dark vinegar
    • 4 tbsp Shaoxing cooking wine
    • 1/2 cup dark sugar syrup (those used for baking mooncakes)(can replace with honey)
    • 2 pcs rock sugar (approx. 2 tbsp portion)
    • 2.5 litre water
    • 2 tbsp cooking oil

    Brushing Mixture (B) : 

    • 1 tbsp Hoisin Sauce
    • 1 tbsp dark sugar syrup or honey
    • 50 ml water

    (tsp = teaspoon; tbsp = tablespoon) 

    Method :
    1. Score duck skin with a needle tenderiser. Do not have to puncture/pierce into the meat. Try not to tear the skin. 
    2. Mix dry rub ingredients together in a bowl evenly (i.e. 1 tbsp five spice powder, 2 tsp salt, 1 tsp grounded pepper).
    3. Marinade the duck by dry rubbing mixture on the surface of duck and inside the cavity. Adjust the quantity of salt/powder in accordance to the size of the duck.
    4. Chill the duck in the refrigerator for at least half a day (do not cover with lid).
    5. When time's due, remove duck from chiller to rest at room temperature. 
    6. Heat big pot with cooking oil at medium heat. 
    7. Toss in aromatic ingredients (in Group A) (i.e. ginger, garlic, spring onion, cinnamon, cloves, star anise)  and stir fry till fragrant. 
    8. Fold in mixture comprising all other poaching ingredients (in Group A) into pot and allow to simmer till boiled.
    9. Hold the duck vertically above the pot. Use a ladle to poach duck with boiling poaching mixture.
    10. Repeat at least 3 times till the skin tightens. 
    11. Do not waste the poaching liquid. Strain and freeze poaching liquid in storage boxes to braise or cook other dishes.
    12. Pat dry duck with paper towel.
    13. Insert pineapple chunks to fill up the cavity of duck.
    14. Hang the duck to air dry for at least half a day. 
    15. Pre-heat oven to 190C, grill mode (fan assist) before roast.
    16. Mix all ingredients in Brushing Mixture (Group B) in a bowl evenly.
    17. Arrange duck on roasting pan.  
    18. Lightly brush entire surface of the duck with Brushing Mixture. The skin will easily get burnt if brushed too thick.
    19. Send duck to roast in lower tier of oven for 25 to 30 minutes (subject to size of duck)
    20. Turn duck over and roast for another another 25 to 30 minutes (subject to size of duck). (Note : If you use a roasting rack over the pan like me, you probably do not have to turn the duck as the duck will still be evenly roasted at the bottom as there's no contact at the bottom. Just continue roasting will do.)
    21. Turn duck back to breast side up.
    22. Adjust oven temperature to 230C and allow to roast for another 10 minutes (adjust timing according to size of duck) to achieve crispy skin.
    23. Remove duck from oven when even skin colour is achieved.
    24. Allow to rest at room temperature for at least 30 minutes before cutting the duck to serve.
    25. Remove and discard pineapple chunks from cavity before serve.

    Note : Roasting time and results may vary due to size of duck and different oven makes. Do adjust accordingly. As heat distribution for every oven varies, you may find certain parts of the duck more burnt. If you find any part of the skin starting to burn (usually at the top and the tip of the wings), cut a piece of foil and cover over that portion will do.


    (scroll to bottom of page, click on "Print" or "PDF" icon for printer friendly recipe)