Monday 29 May 2017

Japanese Clear Clam Soup 日式蛤蜊清汤


My husband loves and will always order the Japanese Clear Clam Soup 日式蛤蜊清汤 at Japanese restaurants whenever we visit one. I soon realised that it's easy to make on my own. It'll also allow me to give it a little of our own personal touch by adding onions to cater to our palette.

This Japanese Clear Clam Soup 日式蛤蜊清汤 is really easy to prepare and wouldn't take more than 30 minutes of your time to prepare and cook. It's surely a refreshing soup even in the hot weathers.


Ingredients (enough for 4 pax with rice and other dishes) :
  • 500 gm white clams (degritted, scrubbed and cleaned)  
  • 1 to 2 sachets of dashi powder (to taste)
  • 1 tbsp Japanese sake
  • 1 medium sized onion (peeled and julienned)
  • spring onions & coriander (chopped)(for garnishing and fragrance)
  • 800 ml water
  • salt (to taste)
  • cooking oil

(tsp = teaspoon; tbsp = tablespoon) 


Method :
  1. Heat a little cooking oil in pot at medium heat.
  2. Lightly sautéed onions.
  3. Add water into pot and bring to boil.
  4. Add dashi powder and stir in the pot.
  5. Turn to low-medium heat and fold in clams.
  6. Cover lid and leave to simmer till clams are cooked. Do not overcook the clams. 
  7. Add sake and salt to taste.
  8. Skim off scums.
  9. Garnish and serve whilst hot.


(scroll to bottom of page, click on "Print" or "PDF" icon for printer friendly recipe)


Tuesday 23 May 2017

Chocolate Cakes 巧克力蛋糕


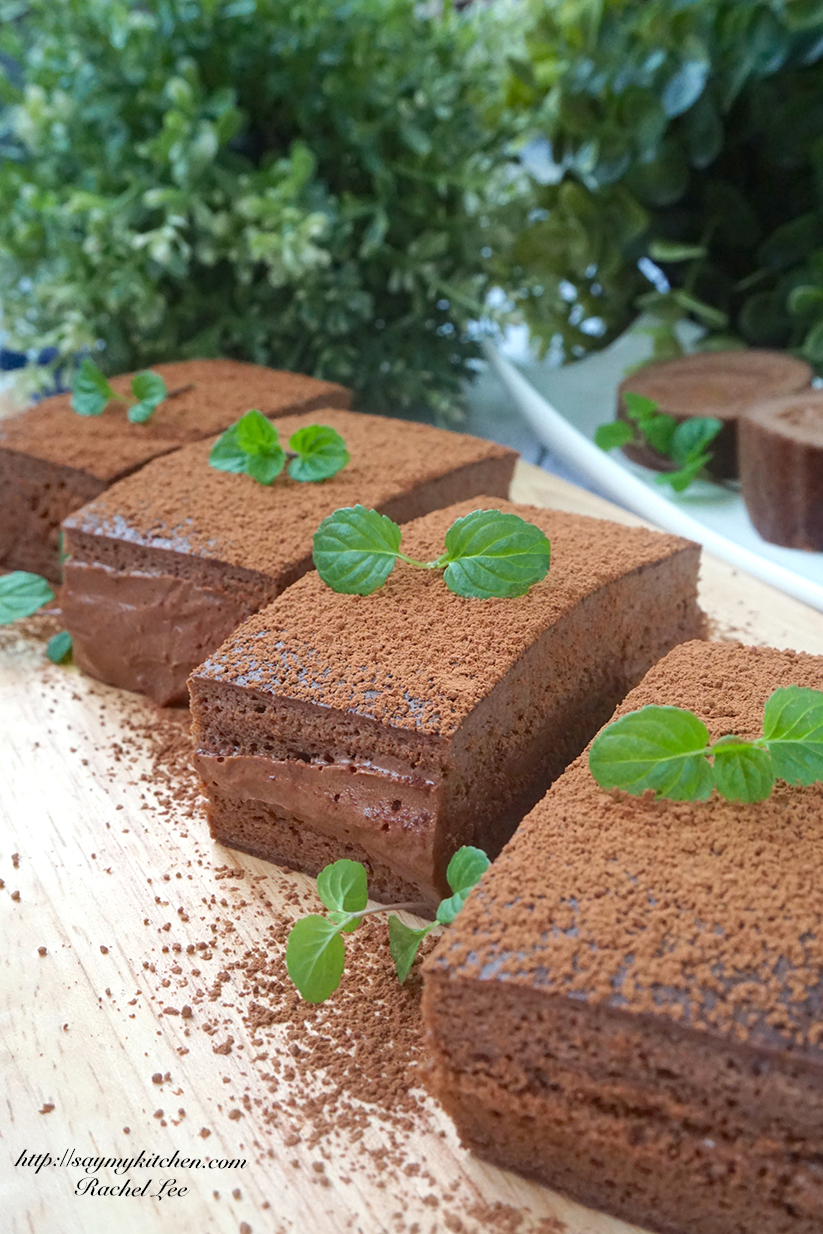
It is a challenge for me to create Chocolate Cakes 巧克力蛋糕 with chocolate cream. Not that it is difficult to make, but I find it challenging to take photographs when there is little or no contrast between the cake and cream colours. As my husband said, it's a challenge for me to make the all chocolate cake(s) taste good and look good!

I decided to bake 2 versions for my family eventually. I split the same batter into 2 trays. One for petite size swiss rolls and the other one for layered cake. You do not have to follow what I did. It is just as good to use the same batter for one whole cake.


Cake Ingredients :
  • 10g sugar free cocoa powder
  • 65 gm cake flour
  • 70 ml full cream milk
  • 40 ml vegetable oil
  • (Group A) 5 large egg yolks (I used 65 gm eggs)
  • (Group A) 20 gm sugar
  • (Group B) 5 large egg whites (I used 65 gm eggs)
  • (Group B) 50 gm sugar

Method (Cake) :
  1.      Sieve cake flour and cocoa powder into a bowl.
  2.      In a separate bowl, add egg yolks with sugar (Group A), milk and vegetable oil. 
  3.      Whisk till even.
  4.      Fold in sieved cake flour and cocoa powder bit by bit and whisk till even.
  5.      Pre-heat oven to 180C.
  6.      In a mixer, fold in egg whites (Group B).
  7.      Start mixing at low speed. Add sugar slowly (Group B).
  8.      Turn mixer to high speed and mix till firm peak.
  9.      Combine egg whites onto egg yolks mixture in 3 batches. Gently fold till even.
  10.      Line baking papers in 2 units of 8-inch square cake tins. 
  11.      Stretch baking paper beyond the edges  for easy dislodgement.
  12.      Gently fold in cake mixture to cake tins.
  13.      Tap cake tin on a hard surface few times to remove any air bubbles.
  14.      Send to bake at 180C for first 5 minutes. 
  15.      Adjust temperature to 160C to bake for another +/-15 more minutes (subject to oven).
  16.      Insert bamboo skewer into cakes to check if they are fully cooked.
  17.      Remove from oven. 
  18.      Immediately dislodge cakes from tins.
  19.      Quicky cover cakes with shrink wraps (to retain cake moisture).
  20.      Allow cakes to cool completely to room temperature.    
  21.      Use a bread knife to trim all the sides neatly if necessary.
  22.      Apply cream and shape/slice/assemble as preferred (swiss rolls or sliced cakes).
  23.      Use cling wrap to wrap final cakes and chill in refrigerator for 2 hours before serve.

Note : I used 2 units of 8-inch tins to make thinner cakes so that I could roll one of them into Swiss Roll. If you do not intend to make Swiss Rolls, use smaller tins to achieve cake heights. It is ok to use one tin instead of 2. Just slice across for layerings when necessary.


Cream Ingredients :
  • 200 gm heavy cream (bring to room temperature)
  • 80 gm couverture chocolates

Method (Cream) :
  1.     Beat heavy cream till soft peak.     
  2.     Melt chocolate in hot water bath or microwave for 30 seconds. 
  3.     Keep stiring till chocolates are fully melted.
  4.     When ready, combine melted chocolate and whipped cream. 
  5.     Gently fold till even and creamy.
  6.     Chill cream in refrigerator for 1 hour before use.

Decoration Ingredients :
  • sugar free cocoa powder (for sprinkling on top of cakes just before serve)

(scroll to bottom of page, click on "Print" or "PDF" icon for printer friendly recipe)


SaveSaveSaveSave
Wednesday 17 May 2017

Layered Japanese Cotton Soft Cake 另类日式棉花蛋糕


I must confess that I had no intention to document the trial recipe for this Layered Japanese Cotton Soft Cake 另类日式棉花蛋糕 as I meant to just experiment making other versions of the Japanese Cotton Cheese Cake. My motives were to omit the cheese and butter in the cake and incorporate a homemade blueberry cream in between layer(s) if possible. At the same time, I was hoping to retain the soft texture that's typical of a cotton cheese cake without compromising on taste. Hence, I have to apologise that I did not take any work-in-progress photos as I did not know how the cake would turn out to be. 

What I can provide are my recapitulations of what I did for the cake and the blueberry cream. Bear in mind that I had baked a small cake as experiment. As I wanted my cake to look like a layered cake, I sliced across and assembled to achieve the layers. It is really up to individual's creativity and vision in the assembling. Actually, I do not mind consuming the naked cake as-it-is.  It could be a simple indulgence even without any layerings and cream.


Cake Ingredients :
  • 1 whole large egg (I used 65 gm eggs)
  • 3 large egg yolks (I used 65 gm eggs)
  • 50g full cream milk
  • 40g vegetable oil
  • 50g cake flour
  • 40g castor sugar
  • ¼ tsp salt
  • 1/8 tsp cream of tartar

Method :
  1.      Sieve cake flour.
  2.      In a separate bowl, whisk 1 whole egg + 3 egg yolks.
  3.      Stir in milk till even.
  4.      Heat vegetable oil in saucepan at low heat till streaks starts to appear.
  5.      Fold in oil to sieved cake flour and whisk till even.
  6.      Fold in oil batter into wet ingredients.
  7.      Whisk mixture evenly.
  8.      Pre-heat oven to 150C.
  9.      In a mixer, fold in salt, cream of tartar and egg whites.
  10.      Start mixing at low speed. Add sugar slowly.
  11.      Turn mixer to high speed and mix till firm peak.
  12.      Combine egg whites onto egg yolks mixture in 3 batches. Gently fold till even.
  13.      Line baking paper in a smallish square cake tin. 
  14.      Stretch baking paper beyond the edges  for easy dislodgement.
  15.      Gently fold in cake mixture to cake tin.
  16.      Hit the bottom of cake tin on a hard surface few times to remove any air bubbles.
  17.      Send to bake at 150C for 40 to 45 minutes using water bath method.
  18.      Remove from oven. Invert cake to cool on cooling rack.
  19.      Use a bread knife to trim all the sides neatly.

Cream Ingredients :
  • ½ box blueberries (about 20 pcs)
  • 1 tbsp sugar
  • 50g cream cheese
  • 25g fresh cream (whip cream till fluffy with mixer first) 

Method :
  1.     Add sugar to a saucepan at low-medium heat and allow to caramelized.
  2.     Fold in blueberries and cook till sauce thickens.
  3.     Sieve blueberry sauce to a bowl and allow to cool to room temperature.
  4.     When ready, combine blueberry sauce, cream cheese and whipped cream. 
  5.     Gently fold till even and creamy.
  6.     Chill blueberry cream in refrigerator for 30 minutes before use.

(scroll to bottom of page, click on "Print" or "PDF" icon for printer friendly recipe)


Friday 12 May 2017

Deep Fried Prawn Paste Chicken Wings 虾酱炸鸡翅


I have fallen sick for 2 whole weeks and have almost lost my sense of tastes to the variety of medicines I have been taking. With the persistent high fever, flu and cough, my diet had been very controlled. I had mainly porridge and vermicelli in soup for 2 weeks. Now that I'm almost recovered, I think I justify something tasty to help regain my taste buds. The Deep Fried Prawn Paste Chicken Wings 虾酱炸鸡翅 is something I crave for but hardly cook for my family. For once, I thought I would spoil them a little with this dish.

Deep Fried Prawn Paste Chicken Wings 虾酱炸鸡翅 is a popular tze char (hot fry) dish in Singapore, well loved by children and adults. There are of course many versions of creating the most tasty and crispy chicken wings. Some feel that the shrimp paste makes the difference. Some claim it is the combination of flour used to create the batter that's the winning formula. I am not in favour to use various types of flour to create an ideal batter. I thought my simple home cook method of preparing this dish is simple, flavourful, yet crispy. And that's enough to satisfy our humble appetite.


Ingredients (enough for 4 pax with rice and other dishes) :
  • 7 fresh chicken mid wings and 7 drumlets  
  • 1 tbsp prawn paste (refer to picture below - use the left one if you prefer a more pungent taste; use the right one if you prefer a milder taste. I used the one on the left.)
  • 3 tbsp tapioca flour
  • cooking oil

(tsp = teaspoon; tbsp = tablespoon) 

Method :
  1. Marinade chicken mid wings and drumlets with prawn paste. Toss to ensure all winglets and drumlets are evenly coated with prawn paste. Cover and leave in refrigerator to marinade for 4 to 5 hours.
  2. Remove chicken winglets and drumlets from chiller 1 hour before cook. 
  3. Coat all chicken winglets and drumlets with tapioca flour. 
  4. Spread coated chicken winglets and drumlets on a tray and send back to chill in refrigerator. The key is to keep the chicken dry if we want to achieve crispiness when fry.
  5. Heat cooking oil in saucepan/wok at medium heat when ready to fry chicken winglets and drumlets.
  6. Remove chicken winglets and drumlets from refrigerator again.
  7. Fold in chicken winglets and drumlets into hot cooking oil and allow to deep fry for 5 minutes. Ensure chicken winglets and drumlets are fully submerged into hot cooking oil.
  8. Deep fry at medium heat to allow the insides to be fully cooked. The colour of the chicken winglets and drumlets would be a light golden brown by then. 
  9. Remove chicken winglets and drumlets from hot cooking oil and leave to cool on a plate lined with paper towel.
  10. Repeat Step 7 to 9 till all chicken winglets and drumlets are deep fried for first round.
  11. Turn to high heat, and refry all the chicken winglets and drumlets in the same cooking oil again a second round for another 3 to 5 minutes (or till colour turned to darker golden brown).
  12. After this double frying process, remove chicken winglets and drumlets from saucepan/wok and leave to cool before serve. 

(scroll to bottom of page, click on "Print" or "PDF" icon for printer friendly recipe)


The double frying process is really the key to achieving crispiness to the Deep Fried Prawn Paste Chicken Wings 虾酱炸鸡翅. Believe it or not, it is less oily too. 


Wednesday 3 May 2017

Huiji Herbal Steamed Rice in Lotus Leaf 药膳荷叶蒸饭


I believe many would agree that Sticky Rice in Lotus Leaf is ranked as one of the staples in a traditional Cantonese Dim Sum restaurant. As much as I like it, I do know that glutinous rice is a not advisable for people with gastritis as it's difficult to digest. I happen to have 2 gastritis patients at home. Therefore, I had to think out of the box and replace glutinous rice with Japanese short-grained rice when cooking this version of Huiji Herbal Steamed Rice in Lotus Leaf 药膳荷叶蒸饭. Really, texture wise, there's no significant compromise by using short-grain rice instead of the traditional glutinous rice. 

I had again applied Huiji Waist Tonic in this dish. The bottle of goodness which include cordyceps (虫草), ginseng  (人参), du zhong (杜仲), dang gui (当归), he shou wu (何首乌) and jujube  (大枣) was just too convenient for cooking purposes. Having cooked a previous dish with Huiji, I knew the taste would not go wrong, plus the nutritional benefits it would deliver, I was actually happy to add them onto my Huiji Herbal Steamed Rice in Lotus Leaf 药膳荷叶蒸饭.


Ingredients (enough for 4 pax) :
  • 2 cups Japanese short-grain rice (washed, rinsed, soaked for 1 hour and drained)(approx. 1/2 cup rice per pax)
  • 1 whole big lotus leaf (to be cut into 4 for wraps after slow cooking and cleaning)
  • 150 gm skinless and boneless chicken fillet (chopped to chunks)
  • 8 pcs dried mushrooms (soaked till softened and coarsely chopped)(keep the mushrooms water for cooking use)
  • 2 pcs Chinese sausages/lup cheong (腊肠)(thinly sliced)
  • a small handful of dried scallops (干瑶柱)(soaked till softened, then shredded)
  • 1 tbsp dried shrimps (soaked till softened)
  • 1 tbsp goji berries
  • 1 stalk of chopped spring onions (for garnishing)
  • 1 stalk of chopped coriander (for garnishing)
  • strings to fasten lotus wraps for steaming

Seasonings : 
  • 50 ml Huiji waist tonic 
  • 1 tbsp Shaoxing cooking wine 
  • 1 tbsp oyster sauce
  • 1 tbsp light soy sauce
  • 1/2 tbsp dark soy sauce
  • 1/2 tsp salt
  • 1/2 tsp five spice powder
  • a dash of grounded white pepper
  • 4 thin slices ginger (finely chopped or minced)
  • 3 cloves garlic (finely chopped or minced)
  • 2 cups water (use the water that's used to soak mushrooms)
  • cooking oil
  • sesame oil (for marinade)

(tsp = teaspoon; tbsp = tablespoon) 

Method :
  1. Soak Japanese short-grain rice for 1 hour prior to cooking.
  2. Soak whole big piece of lotus leaf in a big pot or wok. Turn on low heat and let it slow boil for 1 hour. This process would rid of stubborn dirts and soil particles from the lotus leaf. 
  3. Meanwhile, marinade chopped chicken fillet with a little salt, light soy sauce and sesame oil. Set aside. 
  4. When 1 hour time's up, remove lotus leaf from pot/wok. Rinse lotus leaf in running water till clean and all sand particles removed.
  5. Spread lotus leaf on a flat surface to pat dry and air dry. 
  6. Heat a little cooking oil in a big pot and add all ingredients and seasonings into it. 
  7. Stir all ingredients and seasonings evenly at low heat.
  8. Turn off heat once ingredients and seasonings are evenly mixed.
  9. Use a pair of scissors to cut lotus leaf into 4 portions.
  10. Scoop rice and ingredients into a bowl first before transferring onto lotus leaves. This would ensure every packet gets the same portion size.
  11. Fold each packet carefully and fasten with a string if necessary.
  12. Send wrapped lotus leaf rice to steam for 60 to 90 minutes (subject to your preference on the texture of the rice) in low-medium heat. Check occasionally and top up water should the water level goes down in the pot or steamer.
  13. When time's up, open up one packet to check. If rice is fully cooked to your satisfaction, remove all from steamer, garnish and serve whilst hot.

(scroll to bottom of page, click on "Print" or "PDF" icon for printer friendly recipe)


Mother's Day may be fast approaching, it's still not too late to learn and cook something nourishing for your mother or/and wife.  The Huiji infused dishes may just be something unique for all.

If you are interested to know more about Huiji Waist Tonic, please click here. They are currently running a Mothers' Day bundle special promotion. A great gift to be considered for your beloved Mother & Wife.