Showing posts with label Pizza. Show all posts
Thursday, 13 December 2018

Omelette with CP Pizza Pockets


* in collaboration with CP for Pizza Pockets

Ingredients :

  • 1 packet CP Pizza Pocket 
  • 4 eggs
  • 1 mid sized onion (cut to chunks)
  • a handful of assorted colours capsicum (cubed)
  • 5 pcs prawns (optional)(deveined/deshlled and lightly seasoned with salt)
  • a pinch of salt
  • parsley flakes (garnishing)
  • cooking oil

Method :
  1. Pre-heat oven at 180C.
  2. Crack eggs in a bowl. Add salt, onions and capsicum. Mix well.
  3. Heat cooking oil in a skillet/pan.
  4. Fold in egg mixture to spread evenly across skillet/pan.
  5. Quickly arrange frozen CP Pocket Pizza and prawns onto egg mixture.
  6. Allow to pan fry till bottom of omelette turns brown.
  7. Transfer entire pan to oven.
  8. Allow to cook in oven for another 8 to 10 minutes (or to your desired texture and colour).
  9. When time’s up, remove from oven, garnish and serve whilst hot.


Monday, 28 May 2018

Bread Maker Fun : Homemade Pizza Crust 自制比萨饼皮


This is a very simple, fuss free recipe. If you do not have a bread maker, simply use hands to knead till right texture and leave it in oven to rest for about 1 hour. Do not need to power on the oven when dough is resting in the oven. It's really that easy!


Ingredients for Pizza Crust Dough (enough for 2 large pizzas) :

  • 1 tsp salt
  • 1 tbsp sugar
  • 2 tbsp coconut or peanut oil
  • 1/2 cup lukewarm water
  • 2.5 to 3 cups bread flour
  • 1 to 2 tsp dried rosemary (finely chopped)
  • 2 tsp instant yeast

(tsp = teaspoon; tbsp = tablespoon)    


Tip 1 : Store yeast in freezer for longer life and effectiveness.

Tip 2 : When adding ingredients, do not let yeast get in direct contact with salt and water. Salt is a yeast inhibitor. It would retard or stop yeast activity.


Method :
  1. Add all ingredients (in accordance to sequence mentioned above) into bread maker's bread pan.
  2. Mount bread pan into bread maker and close lid. 
  3. Set breadmaker to 'Dough' mode. Press 'Start'. 
  4. The knead blade would start working. After about 5 minutes, you should see a nicely kneaded dough. In the first few minutes, if you see the dough being too watery, add a little bread flour. If you see the dough being too dry, add a little water (tsp by tsp) slowly until satisfied. Leave the dough in the bread maker for about 1 hour. 
  5. Preset oven to 220C.
  6. Line pizza baking tray with baking paper. Remove dough from bread maker and split to half. 
  7. Roll dough to desired thickness and shape (with rolling pin or hands).
  8. Top with preferred pizza toppings/ingredients.
  9. Bake entire pizza/pizzas in oven for 30 mins at 220C (subject to thickness of crusts and toppings).  
  10. Remove from oven and serve.

Notes
a.  I used only half portion dough to make 1 pizza on first day and used an air-tight container to keep the other half portion dough in the chiller. I made the 2nd pizza on the 3rd day. If you intend to keep the dough longer (up to 2 weeks), do freeze the dough. 

b. Do note that temperature and baking time may vary in accordance to different oven makes, sizes and  performances. Make your own adjustments as you know your oven better. 


(scroll to bottom of page, click on "Print" or "PDF" icon for printer friendly recipe)


Saturday, 4 February 2017

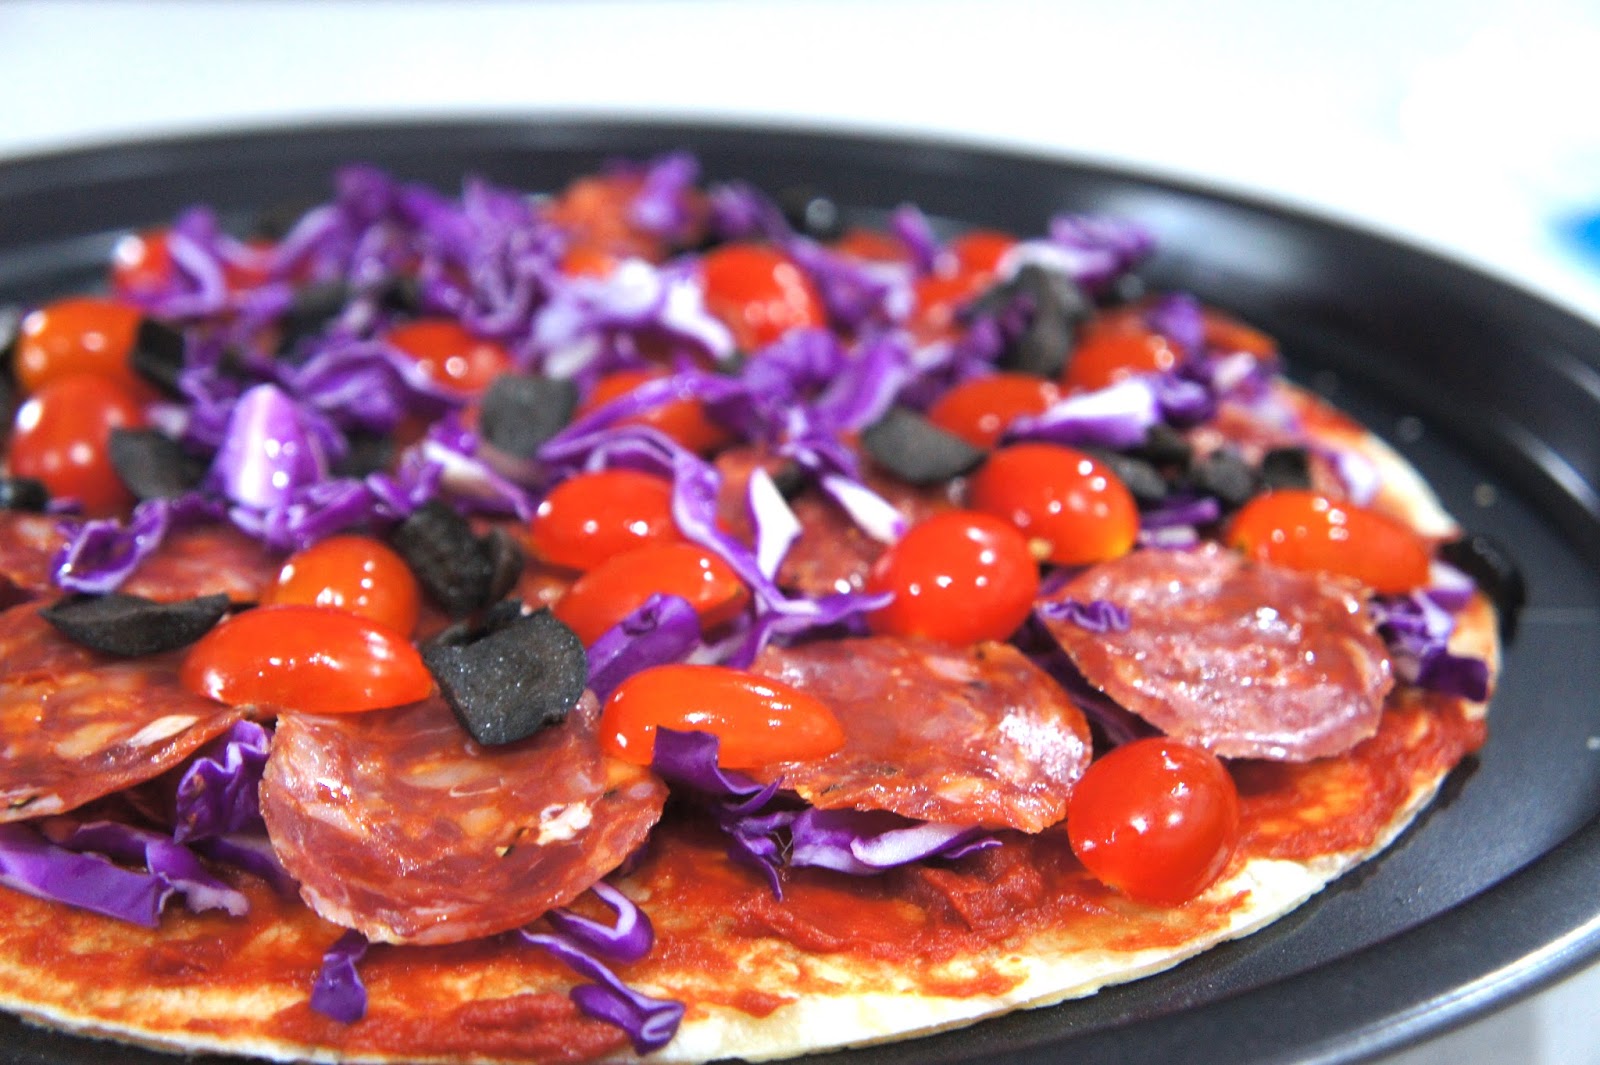
Salami & Veggies Pizza 萨拉米香肠与蔬果比萨


When I unsealed my packet of salami, everyone at home shied away. They covered their noses and  yelled "Smelly! (臭!)". Errr.....what do you expect out of air dried fermented sausages? I knew instantly that I could not serve the salami as it should be - cold cuts. 

To make it palatable for my family members, I needed to mask the pungent fermented smell. Otherwise, the salami would go to waste. My quick fix was to make them into a Salami & Veggies Pizza  萨拉米香肠与蔬果比萨. I was counting on the cheese to make the salami from 'Appalling' to 'Appealing'. Actually, my version of the pizza is not so true to its name. Strictly speaking, except for the red cabbage, tomatoes and olives are fruits, not vegetables. I did not use red cabbage just for its colour. It is one of the vegetables that would not turn soggy in the high heat oven.

Salami can be overwhelming in taste. Besides cheese, I decided to introduce lots of veggies/fruits to balance the taste and feel. Believe it or not, the Salami & Veggies Pizza  萨拉米香肠与蔬果比萨 turned out to be surprisingly pleasing. All gone in the wink of an eye! 

It was well worthwhile my 30-minutes prep cum cook time. 


Ingredients (enough for a large 12" pizza) :

  • 15 to 20 pcs of salami
  • 1 large piece of pizza crust (i used off-the-rack Mission brand)
  • 3 tbsp thick tomato paste (Recipe for freshly made ones here)(I used canned tomato paste this time).
  • 1 cup shredded or finely chopped red cabbage  
  • 1 cup of cherry tomatoes (sliced to halves)
  • 8 black olives (sliced)(I used bottled ones from supermarket)
  • 150 gm grated mozzarella cheese
  • few sprigs of mint (for garnishing)(if you like the taste of mint leaves, they balance the pizza taste really well)

(tsp = teaspoon; tbsp = tablespoon)    


Method : 
  1. Pre-heat oven at 200 degrees celsius or 392 degrees fahrenheit. 
  2. Spread tomato paste evenly on pizza crust.
  3. Spread 80% of shredded red cabbage over tomato paste. 
  4. Lay salami pieces on red cabbage.
  5. Lay tomatoes and olives.
  6. Spread the remaining 20% red cabbage evenly.
  7. Spread shredded mozzarella cheese atop.
  8. When ready, turn oven to 220 degrees celsius or 428 degrees fahrenheit.
  9. Transfer pizza to oven and bake for 15 minutes.
  10. When ready, garnish and serve with sprigs of fresh mint.

TipIf you are making your own dough, do remember to dock your pizza base with a fork or docker. This is to avoid your pizza crust from bubbling and blowing up in the oven.

(scroll to bottom of page, click on "Print" or "PDF" icon for printer friendly recipe)


What I find unforgettable in this Salami & Veggies Pizza  萨拉米香肠与蔬果比萨 - the moments when the roasted tomatoes squirted in the mouth. The acidity of tomatoes in the mouth goes really well with the salami and cheese. This is one pizza that leaves a long aftertaste....


Monday, 26 December 2016

Christmas Eve to Boxing Day Essentials 家庭式圣诞嘉年华


I must apologise profusely for having gone MIA for many moons. My husband and I are staying with my parents temporarily (not so temporary actually...would be 1 year+ soon....). In this home, mom takes the call of what to buy and cook for our meals. I am taking a backseat for the time being, till our new place is ready in 2H 2017. 

Nonetheless, I still manage to whip up some great stuffs this Christmas. As I was multi-tasking various dishes and preparing within a tight time frame, I had not taken photographs on the work-in-progress. Just sharing here what I have cooked these few days....


Roasted Turkey Breast

Smoked Salmon, Arugula & Mixed Veg Salad

Pan Fried Rosemary & Mint Lamb Racks

Home-made Hawaiian Pizza

Home-made Pizza with Black Olives & Arugula

Baked Spaghetti Bird Nest with Egg

Baked Spaghetti Bird Nest with Egg - Runny Egg Yolk!

Easy Baked Potatoes


I am looking forward to cook more often and to share more recipes soon...Meanwhile, here's wishing one and all a blessed festive season :)


Thursday, 27 August 2015

Grilled Salmon Pizza with Crispy Sambal Shrimps


My Arugula Rocket gave me its first harvest after I sowed the seeds 5 weeks ago. I was excited with my labour of love. I was not expecting good harvest as it was my first attempt to grow vegetables in my small organic herbs terrace. I was wrong! 

I thought the peppery flavour from the arugula leaves would marry well with the piece of salmon that I was thawing in the refrigerator and Grilled Salmon Pizza seemed like a good idea.

Most online recipes use smoked salmon for pizzas. I had no intention to follow suit. My recipe would minimise the usual 'fishy' smell from cooked salmon, thereby, making the pizza absolutely delicious.


Ingredients & Condiments :
  • 1 pc of 12-inch pizza crust (available in supermarkets)
  • 1 cup of arugula rocket leaves 
  • 1 cup of mozzarella cheese
  • 1 cup of salmon (about 300 gm)(sliced to thin pieces)(pre-marinated with few drops of sesame oil and 1/2 tsp teriyaki sauce)
  • 1 large onion (sliced to rings)
  • 2-3 small peppers (optional)(sliced to thin pieces)
  • 1 cup of pizza sauce (mix 4 tbsp sour cream with 2 stalks of finely chopped parsley well)
  • 1 tbsp crispy sambal shrimps (available in supermarkets)

(tsp = teaspoon; tbsp = tablespoon) 


The same crispy sambal shrimp that I used for my seafood paella.

Method :

Grease 12 inch pizza pan and pre-heat oven at 180 degrees celsius (for 15 minutes). I still feel that it is nicer to bake the pizza directly on the oven rack (without a pan) as it gives us a crispier crust, but the thought of cleaning the oven rack.....duh...
Spread pizza sauce on crust. Do not spread to the brim. Leave an edge.
As I was already using sour cream as base, mozzarella cheese was added sparingly to avoid the pizza being too rich, too oily. I only added shredded mozzarella cheese at the centre for flavouring purpose.
This is the essential part. Onions must be added to complement the salmon. This would bring down the 'fishy' smell of the salmon quite significantly. In this instance, I added a little sliced peppers too.
Arrange salmon pieces on top of the onions.
Sprinkle crispy sambal shrimps on the salmon pieces and pizza is ready for oven.
Bake pizza in oven at 180 degrees celsius for 20 minutes. After 20 minutes, increase heat to 200 degrees celsius and bake for another 5 minutes. At these temperatures, the salmon would still retain its moisture whilst the cheese would be slightly burnt when the pizza is removed fro the oven.
Remove hot pizza from oven.
Top with arugula rocket leaves and the pizza is good to be served.
If you prefer it to be more spicy, just sprinkle more crispy sambal shrimps (or chilli flakes) on your pizza before eating.
Absolutely delicious...you can savour the freshness of all ingredients.


Tuesday, 4 August 2015

Homemade Hawaiian Pizza ~ My Style ~


Hawaiian Pizza is not created in Hawaii. It is very much a Canadian invention. What do we associate Hawaiian Pizza with? You cannot go wrong with the few main ingredients : pineapple, ham or bacon, tomato base and lots of cheese.  

I like my pizzas to be colorful. Hence, my Hawaiian Pizza will look somehow unconventional with tomatoes and english parsleys toppings. It is absolutely delicious, filled with freshness and goodness...

My dog has been shredding profusely recently. I concluded that this may not be the best time to roll my dough in my open kitchen. For hygiene reason, I am using a ready made 12-inch pizza crust that is available from supermarkets.


Ingredients & Condiments :
  • 1 pc of 12-inch pizza crust
  • 1 cup of fresh pineapples (diced)
  • 2 cups of mozzarella cheese
  • 1 cup of ham or bacon (diced)
  • 2 tsp of bacon bits (optional)
  • 1.5 cup of tomato pizza sauce (refer to my homemade version here)
  • 1 cup of fresh tomatoes (diced) to be used as toppings
  • finely chopped english parsley to be used as toppings

(tsp = teaspoon; tbsp = tablespoon) 


Method :
Grease the pizza pan if you intend to bake your pizza with a pan. Otherwise, the crust will be crispier if you bake the pizza on the oven rack without a pan.
Place pizza crust or dough on pan. I used a pre-made pizza crust purchased from supermarket. If you are making your own dough, do remember to dock your pizza base with a fork or docker. This is to avoid your pizza crust from bubbling and blowing up in the oven.
Spread the pizza sauce over the base. Do not spread to the brim. Leave an edge.
Spread mozzarella cheese over the pizza sauce. Be generous with the cheese.
Top the pizza with ham/bacon, pineapple dices, bacon bits and more cheese.
Preheat the oven at min. 200 degrees celsius 15 minutes before bake. When you are ready, bake the pizza in the oven. As my oven has limited capability, I chose to bake the pizza at 200 degrees celsius for 20 minutes.

If your oven allows, it is always better to bake the pizza in the oven at a higher temperature with shorter time frame (e.g. 240 degrees celsius for 15 minutes).
Fresh from the oven. If you prefer a traditional Hawaiian Pizza, your pizza is ready for the table. 
I prefer more freshness and colours. Hence, I could not resist topping my Hawaiian Pizza with diced fresh tomatoes and english parsley.
An irresistible slice of freshness and goodness.


Again. What's better than FRESH? Savour a mouthful of freshness....