Tuesday, 22 March 2016

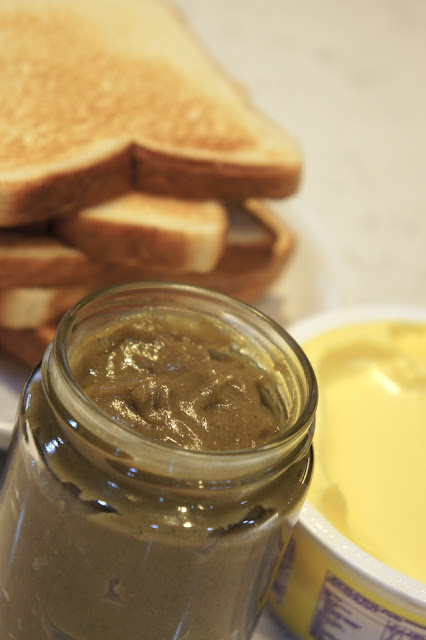
30-Minute Homemade Pandan Kaya 自制香兰咖椰酱


I attempted this Homemade Pandan Kaya (Coconut Egg Jam) 自制香兰咖椰酱 twice in a day. I tried using the bread maker the first time. Alas! I could not regret more! 

Do learn from my genuine mistakes :

  • I should not add gula melaka into my bread pan before they dissolve completely. The screeching sounds - when the palm sugar bits hit the walls of the bread pan were traumatising! I thought the non-sticking bread pan would damage totally after just a few seconds. I definitely made a wise decision to switch off the machine immediately.
  • Unlike my previous jam making experiences, this Pandan Kaya mixture was splattering wildly within the bread pan. I had a hard time cleaning the bread maker (inside out) thereafter. It was still attracting ants hours after the machine had been cleaned.

I must say that there are many successful bread maker's Pandan Kaya recipes that one can find online. It was my fault that I did not do sufficient research. I jumped the queue and relied wrongly on my instincts.

Nevertheless, my second attempt was a successful one! I used a simple saucepan to do the job instead. In my personal attempt to make the Pandan Kaya more authentic, I replaced white sugar with gula melaka (palm sugar) in hope to achieve a more fragrant and traditional aroma. This Homemade Pandan Kaya (Coconut Egg Jam) 自制香兰咖椰酱 is easy to make and would take only 30 minutes! More importantly, it received thumbs up from everyone at home! 


Ingredients (enough for a 255 gm or 9 oz bottle) :
 Download Printer Friendly Recipe
Download Printer Friendly Recipe


  • 150 gm fresh coconut milk
  • 2 large egg yolks
  • 125 gm gula melaka/palm sugar (adjust in accordance your taste)
  • 1.5 tbsp pandan juice (learn how to DIY Concentrated Pandan Juice here)
  • 1/2 tsp pandan essence (optional)
  • 2 tsp corn/potato starch flour
  • 2 tbsp water


(tsp = teaspoon; tbsp = tablespoon)    


Tip 1 : Omit egg yolk so that the cooking timing can be shortened by increasing heat. This would avoid lumpy jam caused by the egg whites.


Tip 2 : Use gula melaka (aka palm sugar) instead of white sugar for the traditional flavour.


Method : 

  • Pound gula melaka/palm sugar to bits.

  • Beat egg yolk and sieve to ensure egg mixture is smooth.
  • Add gula melaka/palm sugar, egg mixture, coconut milk, pandan juice and pandan essence to saucepan and cook at low-to-medium heat. Evenly stir the mixture in the saucepan while cooking so that gula melaka/palm sugar would be completely dissolved. Continue to stir to prevent lumpy mixture.

  • Add starch mixture (by combining 2 tsp corn/potato starch with 2 tbsp water and stir till all flour dissolved in water) to saucepan after 15 minutes.

  • After few minutes of continuous stirring in the saucepan, the pandan kaya would be cooked down. It would look thick and rough.

  • To achieve a smooth and silky texture, use an electric blender to blend the pandan kaya mixture with just a few quick pushes (do not over blend).

  • Once blended, the pandan kaya should achieve a smooth and silky texture. Use a spoon to scoop pandan kaya from the blender. The mixture should not drip (meaning the thickness and texture is correct) if it is blended just nicely.

  • Transfer pandan kaya to a sterilized bottle. It is important to have it completely cooled down before capping to avoid condensation in the bottle. Condensation would result in mouldy kaya. Never consume mouldy kaya. 


Store the freshly made Pandan Kaya 香兰咖椰酱 in refrigerator subsequently. The Pandan Kaya 香兰咖椰酱 has a short life span due to the usage of fresh coconut milk and eggs. That explains why my recipe is meant for a smaller serving. We would not be in time to consume anything more in a short time frame. Try to consume within few days of preparation.

My favorite butter and kaya toast......here I come.....


P.S. - If you prefer to make a larger portion, you would not go too wrong with a 1:1:1 rule. That means almost equal portion of coconut milk (e.g. 200 gm) vs egg yolks (e.g. 200 gm) vs gula melaka (e.g. 200 gm) although I personally prefer to cut down on gula melaka. 


Friday, 18 March 2016

Bread Maker Fun : Pandan Loaf 自制香兰面包


I did not want to waste the leftover homemade pandan juice that I made for Pandan Chiffon Cake 香兰威风蛋糕. I was contemplating to make pandan flavour tarts, bread or kaya. However, I soon realised that I was left with only 60 gm coconut milk in my refrigerator. I knew most pandan flavour tarts and kaya recipes could not compromise for so little coconut milk. My only option was to experiment with pandan bread recipes. My family lives on bread loaves for breakfast.  Pandan Loaf 香兰面包 that's it!

I usually bake our home loaves using my bread maker. Experimenting my own concortion for bread maker recipes was not something new. I was quite confident with my Pandan Loaf 香兰面包 recipe.


 Download Printer Friendly Recipe
Download Printer Friendly Recipe
Ingredients (enough for a 750 gm bread loaf) :
  • 100 ml water
  • 2 tbsp coconut or peanut oil
  • 1/2 tsp salt
  • 2 tsp brown sugar (You would have realised that I really cut down on salt and sugar in my recipe. Add more to your taste if you prefer.)
  • 300 gm bread flour
  • 60 gm fresh coconut milk
  • 2 tbsp condensed milk
  • 1 tbsp pandan juice (learn how to DIY Concentrated Pandan Juice here)
  • 1 tsp pandan paste (available from supermarkets)
  • 1/2 tsp pandan essence (optional)(I added this as I prefer more fragrance from my bread)
  • 1 tsp instant yeast


(tsp = teaspoon; tbsp = tablespoon)    


Tip 1 : Store yeast in freezer for longer life and effectiveness.


Tip 2 : When adding ingredients, do not let yeast get in direct contact with salt and water. Salt is a yeast inhibitor. It would retard or stop yeast activity.


Method : 

  • Heat fresh coconut milk to boiling point (or till it starts bubbling). Set aside.
  • Add condensed milk, oil, pandan juice, pandan paste, pandan essence and water into coconut milk.
  • Stir till mixture is well blended.
  • Fold in mixture into bread pan.
  • Add brown sugar and salt.
  • Fold in bread flour.
  • Last to add instant yeast. Do not let yeast get in direct contact with salt and water. Salt is a yeast inhibitor and would retard or stop yeast activity.
  • Mount bread pan back to bread maker and close lid.
  • Set breadmaker to 'Sweet Bread' baking mode. Select the right weightage (750 gm) and preferred colour tone (light, mid or dark) and press 'Start'. In this instance, it takes 3 hr 25 mins to deliver. 
  • The knead blade would start working. After about 5 minutes, you should see a nicely kneaded dough. In the first few minutes, if you see the dough being too watery, add a little bread flour. If you see the dough being too dry, add a little water (tsp by tsp) slowly until satisfied. Leave the dough alone after that. Try not to flip open the lid as it would disrupt the fermentation. Leave it alone till bread is baked.
  • Remove loaf from bread pan when time is due. If you prefer darker browning of the crust, send it to oven to bake a short 5 to 10 minutes at 160 degrees celsius (320 degrees fahrenheit). Let it cool down before cutting to slices. 
  • Use a bread knife to cut the loaf. A normal knife could not yield nice thin slices.
  • Nice and fragrant bread with almost perfect crust. The slices would go best with pandan kaya (coconut egg jam).


Unlike Pandan Chiffon Cake 香兰威风蛋糕, do not expect Pandan Loaf 香兰面包 to be melt-in-the-mouth kind of soft and fluffy. It is more crusty on the outside. As for the inside, it is still very soft, though with a little more texture. Nevertheless, it is a fantastic loaf and I could smell freshly baked aroma from afar!


Thursday, 17 March 2016

Tomato Braised Fish 番茄烹鱼


Steamed rice is a staple in many Asian families. It is our main source of carbohydrates. It gives us energy. To whip up a balanced diet, it is essential that we include some meats and vegetables to go with plain rice. I cook Tomato Braised Fish 番茄烹鱼 once in a while as it checks all the criteria as a healthy and tasty dish.

Would you want a dish that is colourful? Would you want a dish that is delightful? Try Tomato Braised Fish 番茄烹鱼!


Ingredients (enough for 3 to 4 pax with steamed rice and other dishes) :
Download Printer Friendly Recipe

  • 3 to 4 sections of any fish of your choice (pre-marinated with 1/2 tsp salt)(preferably mid-sections for thicker meat or whole fish)(I used sections of Padang fish)
  • 3 to 4 tomatoes (cut to wedges)
  • 1/2 red capsicum (cut to chunks)
  • 1 medium sized onion (peeled and sliced)
  • 4 cloves of garlic (finely chopped)
  • 2 slices of ginger
  • 1 stalk of spring onion (chopped for garnishing) 
  • 1/2 cup water
  • cooking oil


Seasonings :

  • 4 tbsp ketchup
  • 1/2 tsp salt (for marinating the fish meat)
  • 1/2 tsp salt (for cooking)
  • 2 tbsp sugar
  • 1 tbsp light soy sauce (or adjust in accordance to your taste)

(tsp = teaspoon; tbsp = tablespoon)    


Tip : Pan fry fish meat beforehand for better taste and texture.


Method : 

  • Heat cooking oil and pan fry fish meat first.
  • Remove fish from skillet/wok when meat turns light golden brown. Set aside.
  • Heat cooking oil in skillet/wok again. Use medium heat. Toss in aromatic ingredients (ginger, onions and garlic) and give it a quick stir fry.
  • Toss in red capsicums and tomatoes.
  • Add seasonings and stir fry.
  • Add 1/2cup water.
  • Fold in fish meat carefully.
  • Allow fish to submerge in sauce for a minute before turning off heat and transferring to serving plate. 
  • Garnish and serve hot with steamed rice and other dishes.


The sweet and sour sensation from this Tomato Braised Fish 番茄烹鱼 is not overwhelming but suffice to whet one's appetite, thereby setting a tone for a delightful meal.


Wednesday, 16 March 2016

Homemade Pandan Chiffon Cake 香兰戚风蛋糕

Inspired by : ieatishootipost.sg. Credit to my BFF Angela for trying, testing and adapting the recipes countless times before sharing with us.

New photos updated on May 2017

My BFF Angela must have baked this Homemade Pandan Chiffon Cake 香兰戚风蛋糕 so many times that we deem her an expert in chiffon cakes. Last week, she visited my new home kitchen with our other BFF, Priscilla. Angela did a demo by baking a Pandan Chiffon Cake 香兰戚风蛋糕 on the spot. I would not disappoint her by replicating it on my own. Her hard works on research and numerous trials certainly justify this documentation.

During her demo, Angela told us that it had been challenging  for her to achieve a near perfect Pandan Chiffon Cake 兰戚风蛋糕. The general difficulties she encountered in her many experiments include :

  • cake unable to rise or flatten too soon after removing from oven
  • overheat on the top layer resulting in cracked  surface
  • at times, the inside may still be raw
  • not achieving the right colours
  • too sweet
  • insufficient pandan fragrance
  • .....and the list goes on.....

To bake chiffon cakes, we would usually prepare 2 groups of ingredients for varying processes before combining them as the final cake batter :

Group A Ingredients (for a 23 cm tube pan)


  • 120 gm sifted self-rising cake flour 
  • 6 egg yolks (use 60 gm sized eggs; eggs must be very fresh for best result)
  • 40 gm castor sugar (i reduced from 45 gm to 40 gm due to personal preference)
  • 170 gm fresh coconut milk (available from supermarkets or wet markets)
  • 1 tsp baking powder
  • 1/8 tsp salt
  • 1 tbsp pandan juice (learn how to DIY Concentrated Pandan Juice here)
  • 1 tsp vanilla essence (available from supermarkets)
  • 1 tsp pandan paste (optional - add if you prefer a darker green tone for the cake)(available from supermarkets)
  • 1/2 tsp pandan essence (optional)(I added this because I like my pandan cake very fragrant)

Group B Ingredients (for a 23 cm tube pan)


  • 9 egg whites (use 60 gm sized eggs)
  • 100 gm castor sugar (i reduced from 135 gm to 100 gm due to personal preference)
  • 1/2 tsp cream of tartar 

Method

Pre-heat oven at 170 degrees celsius (338 degrees fahrenheit).

Heat coconut milk. Remove from heat once boiling point is hit (or when bubbling starts). Leave aside.

Beat 6 egg yolks with 40 gm sugar.

If you are using KitchenAid mixer like I am, beat egg yolks and sugar at Speed 6 for about 2 minutes. Set aside when ready.

The normal procedure calls for mixture first and flour to be folded in later. I must confess that I tweaked the steps a little as I missed this part during Angela's demo. I ended up spooning in the sifted flour into 'cooked' but not-so-hot coconut milk before adding other mixtures. Surprisingly, it turned out to be just as fascinating! 

Not forgetting the other Group A's ingredients. Add baking powder, salt, pandan juice, vanilla essence, pandan paste, pandan essence accordingly.

Whisk gently.

When all's well combined, we should see a light green mixture.

Fold in light green mixture into the beaten egg yolks that was set aside earlier. My BFF used the manual whisking method. I chose Speed 4 of my mixer instead. 

Group A's egg yolk batter is ready when a smooth green mixture is achieved. Set aside.

Separately, work on Group B's ingredients. Whisk 9 egg whites in a clean, dry and oil free mixer bowl. 

Whisk 9 egg whites at Speed 4 for 1 minute. Add 1/2 tsp cream of tartar and whisk at Speed 8 for another minute. Finally, add 100 gm castor sugar and whisk at Speed 8 for 1 more minute. 

At the end of 3 minutes, we know that our meringue is ready when the content holds nicely in mixer bowl even when turning it upside down. Group B's ingredients accomplished!

Gently fold in meringue into Group A's egg yolk batter in 3 batches. Each time, use a spatula to gently fold in one direction.

Final cake batter (i.e. Group A + Group B) all ready when no streaks remain.

To rid the air bubbles, I cushioned my island top with a dish cloth and lightly tap my mixer bowl against it a few times before transferring cake batter into tube pan.

Use a satay stick to quickly stir through the cake batter in the tube pan as a final attempt to remove air bubbles if necessary. 

Do not grease tube pan. The cake would not rise if when oiled.

Bake in oven at 170 degrees celsius (338 degrees fahrenheit) for first 10 minutes using Top & Bottom Mode and continue to bake for another 50 minutes at 160 degrees celsius (320 degrees fahrenheit). Do not attempt to open the oven door while making the adjustments as it would impact the temperature and the cake may just fail. 

It is helpful to know that Pandan Chiffon Cake 香兰戚风蛋糕 would generally do well with bottom heat. Try to position tube pan at the lower tier of the oven. I inserted a tray to 'block' the top heat at the upper tier of the oven. I did this in hope to minimise cracks and too much browning at the top of the cake.

I checked the level of browning on the cake surface with a torch light towards the end of 40 minutes. Remove from oven once satisfied with the colour of cake.

Invert tube pan and allow the cake to cool before dismounting. Be patient.

Use a knife to assist with the dismounting if necessary.


New photos updated on May 2017
I guess I was really blessed with beginners' luck in my first attempt on Homemade Pandan Chiffon Cake 香兰戚风蛋糕. The end product was SO SO SO light, soft and fluffy. Almost melt-in-the-mouth. Not too sweet and tasted just right!

This might be my first attempt in Homemade Pandan Chiffon Cake 香兰戚风蛋糕. The response from my family told me that it would not be the last. The entire cake was almost gone within first 15 minutes! 

Of course, I cannot thank Angela enough for sharing her experience and tips!